|
|
X-Trak 3 Configuration
Device Configuration
To configure your device, perform the following steps:
- Download and install the modem USB driver for the device.
- Power up the X-Trak 3 device (if you haven't done so already) and connect the USB cable to your computer.
- The Digi Dashboard tool is a simple Microsoft Windows application, providing a limited user
interface for configuring basic settings for the X-Trak 3 product and performing common management
tasks such as updating firmware and uploading files to the device. Download and install the Digi Dashboard tool.
- Open the Digi Dashboard. To do so, navigate to Start > Digi > Digi Dashboard > Digi
Dashboard. Once the Digi Dashboard opens the Device Information tab should be displayed.
- To configure your mobile settings, select the Mobile tab. Enter your service plan/APN information
into the Service Plan/APN field. This information is provided by the mobile service provider from whom the SIM was acquired. Enter Username, Password, and SIM Pin values, only if required, then click Apply.
Note: “apn.idigi.com” is for example purposes only. Enter your specific service plan/APN information in
place of this text.

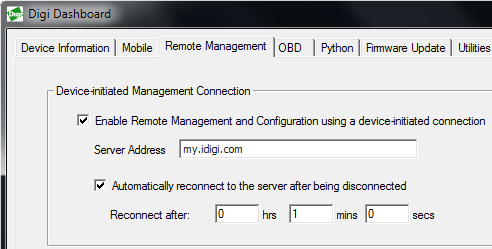
- The Remote Management tab is used to configure the connection to the iDigi Manager Pro
remote management server so that the device knows how to connect to the server. iDigi Manager
Pro allows devices to be configured and managed from remote locations. Select the Remote
Management tab and within the Device-initiated Management Connection section configure the following settings:
- Select the Enable Remote Management and Configuration using a device-Initiated connection checkbox.
- Ensure that my.idigi.com is entered into the iDigi Server Address field.
- Select the Automatically reconnect to the server after being disconnected checkbox, and enter 1 into the mins field.
- Click the Apply button when finished.
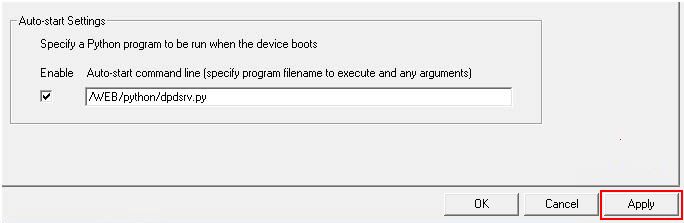
- Select the Python tab and within the Auto-start Settings section and configure the following settings:
- Check the Enable Auto-Start command line option.
- Type /WEB/python/dpdsrv.py into the Auto-start command line field. Please note that the Auto-start command line is case sensitive; text should be entered exactly as shown.
- Click the Apply button when finished.
- Select the Utilities tab then click the Reboot button. Clicking this button will reboot the X-Trak 3 device, apply all newly configured settings and then exit the Digi Dashboard tool.

- Unplug the USB cable from your computer.
Your device's configuration process is complete. Your device is ready for vehicle installation.
Back to Step 2 | Move to Vehicle Installation
|